June 9, 2015

The Homey High School Classroom


For some strange reason there is a belief that high school kids don't appreciate decorated rooms with great ambiance. FALSE! Believe it or not, they love creature comforts, brilliant colors, and inspiring decor. My kids are always telling me, "Mrs. Embry, I love your room. It's my favorite!" I love hearing that! They appreciate the effort. Trust me. 

My room as pictured below was a gradual process. I change and add a little bit each year. It's always so funny (and rewarding) to have juniors and seniors (as I teach sophomore English) stop in and declare "This is so cool! Why didn't you have this when we were in your class?" They notice!

I have a few things planned for the new year, and I will post my progress. Watch for updates!

This is my classroom mid Fall semester last year. *I have tables now.*
*I also make my room homey for me. I spend so many hours here, I need to feel comfortable too.*

This is my library corner.


I have comfy polka dot chairs that are always a coveted seat (especially on reading days). The fabric is wearing, so I hope to try my hand at reupholstering this summer. The coffee table houses the book return tray. The whiteboard above the bookshelf is for book recommendations and requests (though I am toying with the idea of making it a magnetic poetry station). I modpodged printouts of book covers to the words 'READ BOOKS' and mounted them next to the whiteboard.

This area is getting the most attention this summer with Pintrest DIY projects and great finds from etsy, not to mention the addition of a couch (brought in from home when we upgraded). 


This is the front of the room with my whiteboard and SMART projector.

The window on the left is where I record the objectives, class work and homework for each of my three preps. A huge shout out to my hubby for making it for me! The picture frames on the right are bell schedules, progress report dates, reading point deadlines, classroom rules, and a motivational quote. Above the whiteboard are 'Words Not Allowed in Writing' and essay editing symbols.

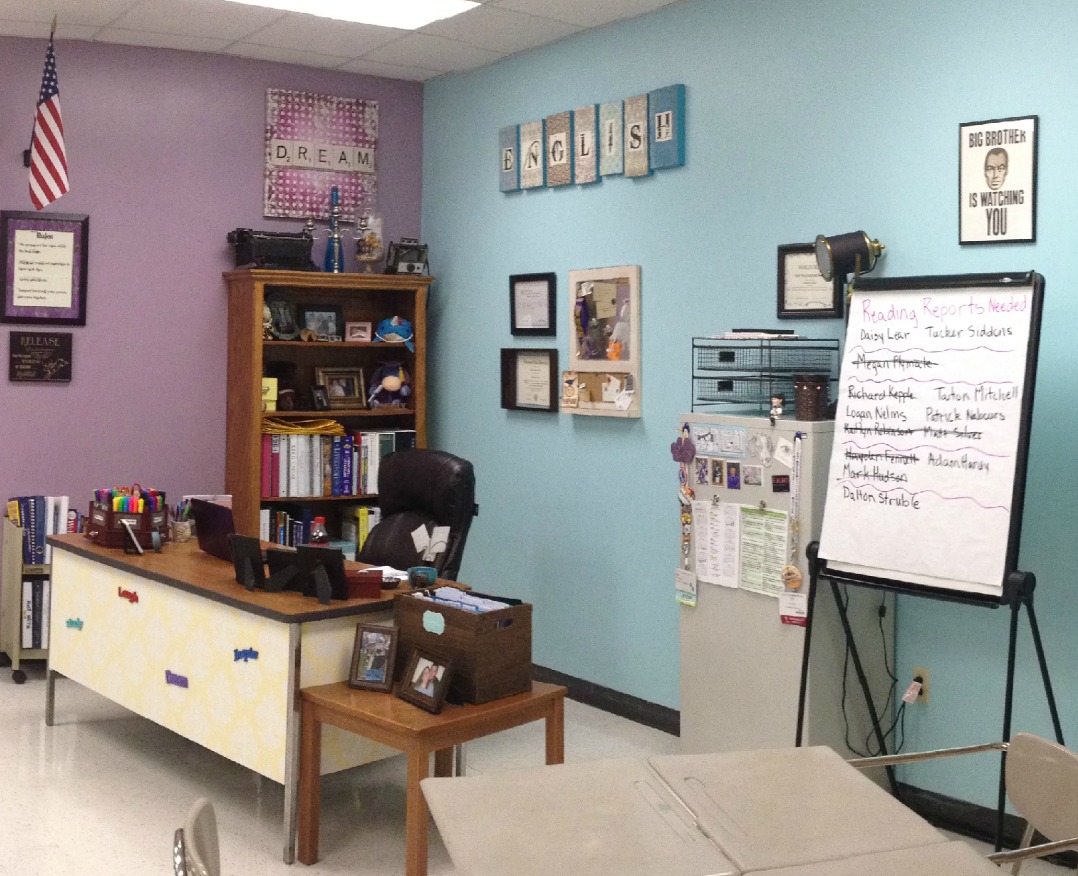
This is my area... the TEACHER'S DESK.  

The desk is covered with contact paper. Another shout out. This one goes to the fabulous art teacher and my best friend for covering my desk and saving me from myself. Being OCD and seeing everything as crooked can be a real pain. This is where I keep all my teacher materials as well.

I get TONS of compliments on the 'ENGLISH' behind my desk. It is so simple (and inexpensive)! 7 shoebox lids with painted edges and tops covered in scrapbook paper with letters printed on resume paper.

This is my computer area.

This is where the students enter the room. On the left side of the door are the hall pass, tardy logs, and classroom log sheets for leaving the classroom. To the left of the computer is my charging station-- a MUST for a 1:1 classroom. The charging station is a dish drainer with a circular power strip and a variety of charging cords. It's inexpensive and holds any of the students' devices.

I hope you've enjoyed my classroom tour. Just remember, it was created gradually. You can do it too. Pintrest is your new best friend and budget saver. 

Thanks for reading! 

June 8, 2015

Avoid the Talking Head: Lecture Free (or Light) Notes


Notes are an unavoidable necessity...BUT we can avoid the Talking Head at the front of the room.

You know the one I mean. The one that drones on in an endless Charlie Brownesque wa wa wa. The one NO ONE listens to because it is soooooooo BORING. The one that puts everyone to sleep...even itself.

Never fear! You will not find a Talking Head here. What you will find are alternative and creative ways to give students necessary lecture notes.


  1. Scavenger Hunt Notes: These require some prep tim but are totally worth it!
          Place a picture related to the notes on one side of the paper and the notes on the other side.        

         
Shakespeare and Petrarch
These notes are on sonnets and forms of sonnets.


Cut each sheet into a puzzle. The number of pieces you make PER SHEET will depend on the number of clues you are giving. I have 5 clues per puzzle, so each sheet is cut into 5 pieces.


Separate the puzzles for groups. **The first time I did this, I didn't use a different color for each group. The result? Mixed up puzzles.** Each group should be represented by a different color.


Add the clues. I find laminating these helps if you're going to use the same clues from year to year. Then put each group in a large manilla envelope labeled according to puzzle color.


**IMPORTANT: If your clues refer to places within your school as mine do, clear the hiding of these puzzles with those affected prior to this activity. It's also a good idea to give your principal a heads up, so there is no confusion as to why your students are wandering all over the school.**

Explain to the students they will be completing a scavenger hunt to find their notes. Once they find all 10 pieces (we have 2 separate puzzles 2 X 5= 10), they are to return to the classroom, assemble the puzzles, and write down the notes in their interactive notebooks (watch for an upcoming pst about these). 

Make it a competiton. The first group done receives a prize: bonus points, homework pass, candy, etc...

You are now ready to assign groups and begin the hunt. Remeber to put the first clue on the board.


Students find a clue on the periodic table in Chemistry class.

Students assemble the puzzle.
Students write the notes.

Voila! No talking head! You will still discuss the notes, but it will be a give and take discussion as you apply the notes.


     2. Visual Notes: These require little to no prep time but are still highly effective!

Assign a topic to be researched by your students.
       We researched the types of politics found in Caesar's Rome.

Figure out the need to knows.
         For each of the 3 types, I wanted them to find 1) the definition, 2) its effect on the Roman
         people, and 3) what it meant for Caesar personally.

Show the students examples.
         Feel free to use my students' examples (below) or google 'visual notes'.

The key is to have a good ratio of pictures to words.
        These are some of the best examples from my students.


Remember to display these. They serve as both decorations and study aides. 

Again, no talking head! And, the kids were responsible for their own learning.


Thanks for reading! Please, share any creative note taking ideas you use.

June 2, 2015

Make it Taboo!


When teaching Julius Caesar this year, I wanted to focus on the power of language...how there is power in the words we use (after all, Caesar was slain first with barbed words and sharp tongues). How could I effectively demonstrate this to doubting teens? Make it Taboo!

I divided the class into 4 or 5 groups (depending on class size). Within these groups, the students played Taboo...with a twist.

The objective? To see language as a powerful tool one weilds purposefully and tactically. 

Or in Common Core termes: 

       To apply knowledge of language to understand how language functions in different 
       contexts, to make effective choices for meaning or style, and to comprehend more fully 
       when reading or listening.


Here's how it works:

        1. Give each group  a stack of taboo cards, a scorecard, and a buzzer. (If you only have one     
            taboo game, any noisemaker will work as a buzzer; students may even choose to use an app 
            on their phones.)

       2. Each group will choose someone to give the clues, someone to control the buzzer, and
           someone to keep score. All other group members will guess the target word.

       3. The game is played in 3 rounds.
    • Round 1: The clue giver can say ANYTHING. The buzzer will not be used this round.
    • Round 2: The clue giver follows the traditional Taboo rules wherein he/she cannot say the words on the clue card. The buzzer will be sounded when any of the taboo words are said.
    • Round 3: The clue giver cannot speak AT ALL. The buzzer is used if ANYTHING is said.
          4. After each round, the score keeper for each group shares their score. As a class, we  discuss 
              any obstacles in that round.

         5. As a class, we discuss how, when language is restricted, it becomes a less powerful tool. 

The 'Aha' moment? When the students realize their ideas cannot be expressed without language. EUREKA!


A student gives clues without restrictions in Round 1.

The kids loved this activity! They said they didn't even feel like they were in English class...too much fun. SCORE!

I think I may use this activity at the beginning of the year next yeaar to answer the age old question, "Why do I have to learn this?".

Thanks for reading!